App Settings
Kiosk terminals
Kiosk mode turns a Windows PC or Mac into a shared terminal, such as a hot desk or meeting room machine. It starts straight into the client, so anyone in your organisation can walk up, sign in with their own work account and reach their workstation.
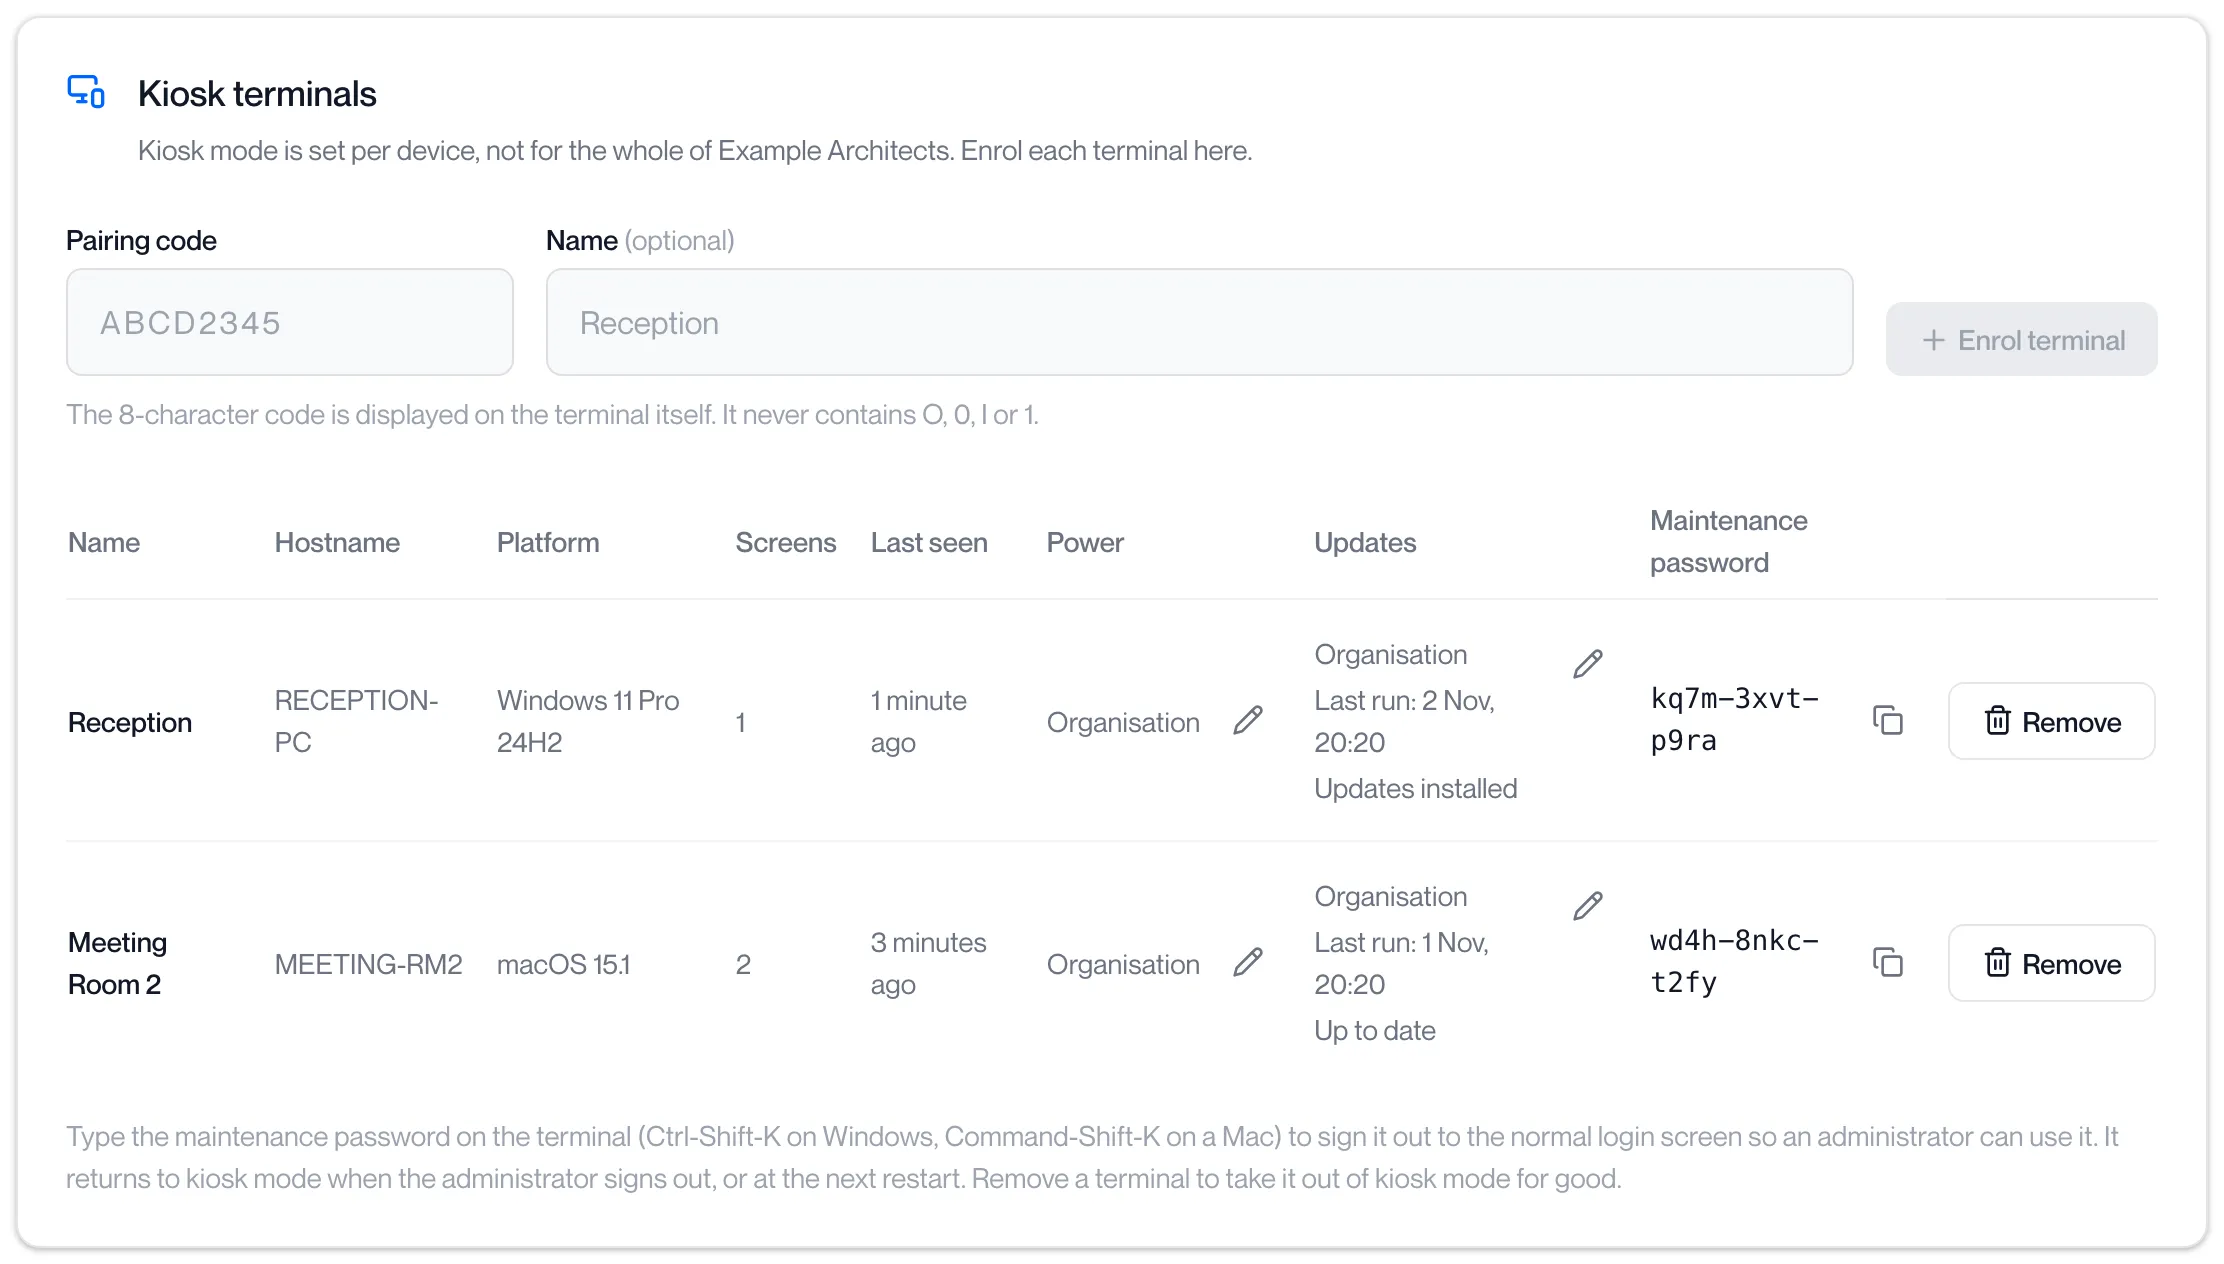
Open Client settings in the sidebar and click the Kiosk tab. The tab has the Set up a kiosk notes and four cards: Kiosk terminals, Kiosk sign-in, Kiosk power and Kiosk updates. The portal side is described here; the terminal side, from installing the client to maintenance at the terminal, is in the Remotle documentation at Kiosk Terminals.
Enrol a terminal
Section titled “Enrol a terminal”-
On the computer, install the client. On Windows, enable Kiosk terminal support.
Then open the client’s Settings, Kiosk, and click Set up as kiosk terminal. The terminal shows an 8-character code. The code never contains O, 0, I or 1.
-
In the portal, enter the code under Pairing code, and a Name if you want one.
The name is optional and up to 60 characters; for example Reception.
-
Click Enrol terminal.
The portal reports ”… enrolled” and the terminal joins the table. A code of the wrong length is refused with “Enter the 8-character code shown on the terminal”.
-
Restart the terminal when it prompts.
It creates a local ComputleKiosk account that signs in automatically and runs the client full screen.
The terminals table
Section titled “The terminals table”| Column | What it shows |
|---|---|
| Name | The name you gave it, or “Unnamed terminal”. |
| Hostname | The computer’s name. |
| Platform | Its operating system and version. |
| Screens | How many screens it reported. |
| Last seen | When it last checked in. |
| Power | Organisation, Custom, or “Changed on terminal”, with a pencil to set a policy for this terminal. “This terminal cannot wake itself; check wake timers in its BIOS” appears when the terminal reported it cannot wake on schedule. |
| Updates | Organisation or Custom, the last run, its result (Updates installed, Up to date, Failed, or Postponed, terminal in use), how many updates are waiting, and Restart needed where one is due. A pencil sets a policy for this terminal. |
| Maintenance password | The password to type at the terminal, with a copy button. |
| Remove | Takes the terminal out of kiosk mode. |
Maintenance. Press Ctrl-Shift-K on Windows or Command-Shift-K on a Mac at the terminal and type the maintenance password to sign it out to the normal login screen. It returns to kiosk mode when the administrator signs out, or at the next restart.
Remove a terminal
Section titled “Remove a terminal”-
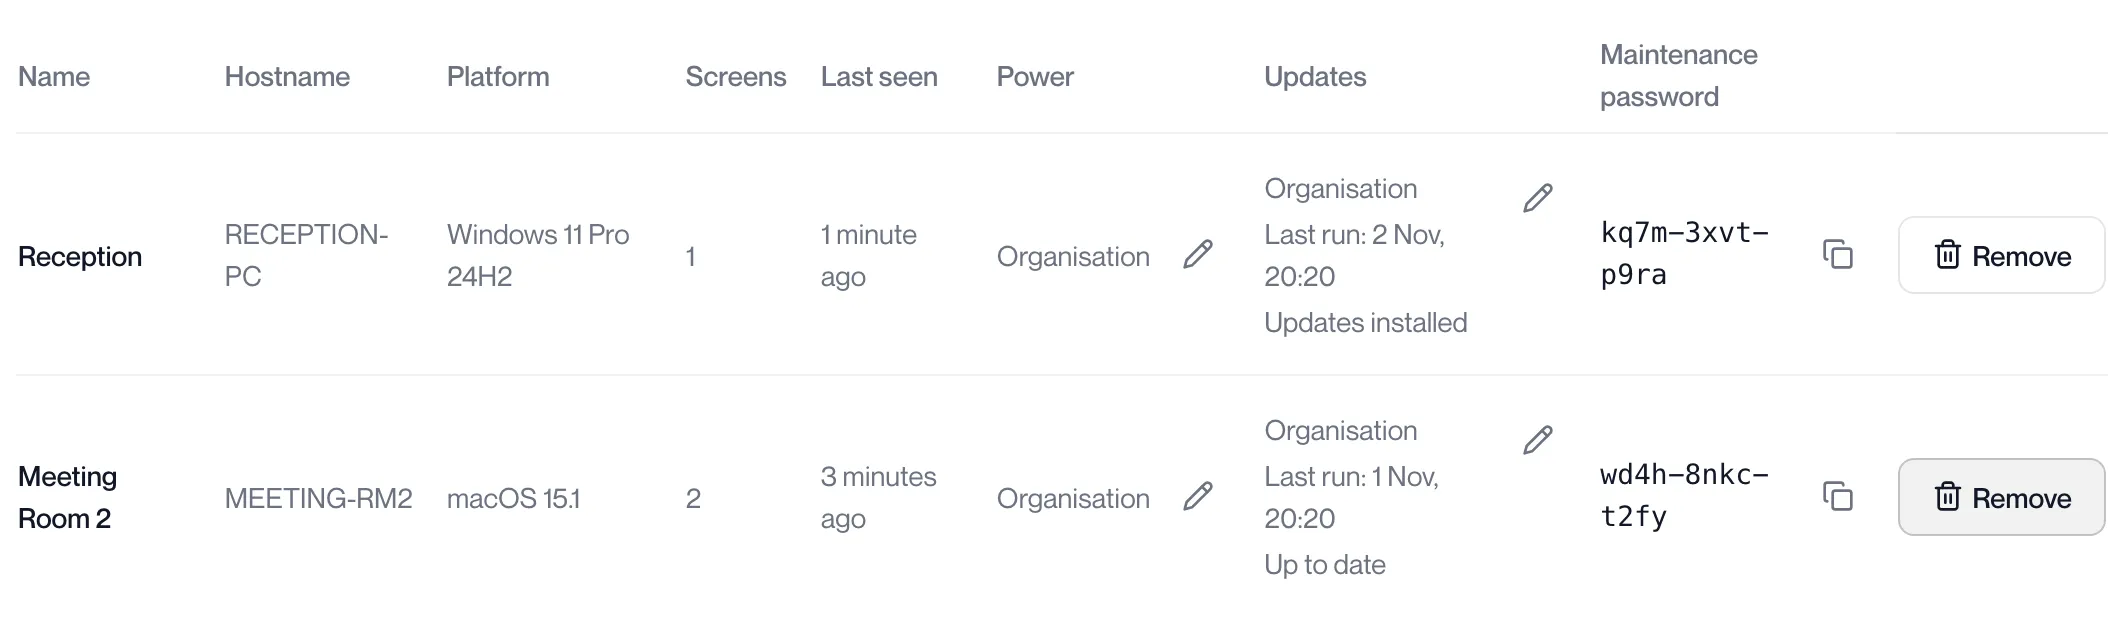
In the Kiosk terminals table, click Remove on the terminal’s row.
-
Read the confirmation and confirm.
It reads “Meeting Room 2 will be unenrolled. On its next check-in it deletes its kiosk account and turns off automatic sign-in, and a new pairing code is needed to put it back into kiosk mode.”
-
The portal reports “Terminal removed”.
The row leaves the table. The terminal itself leaves kiosk mode at its next check-in, within a minute, and returns to the normal Windows or Mac login screen. To use it as a kiosk again, enrol it with a new pairing code.
Kiosk sign-in
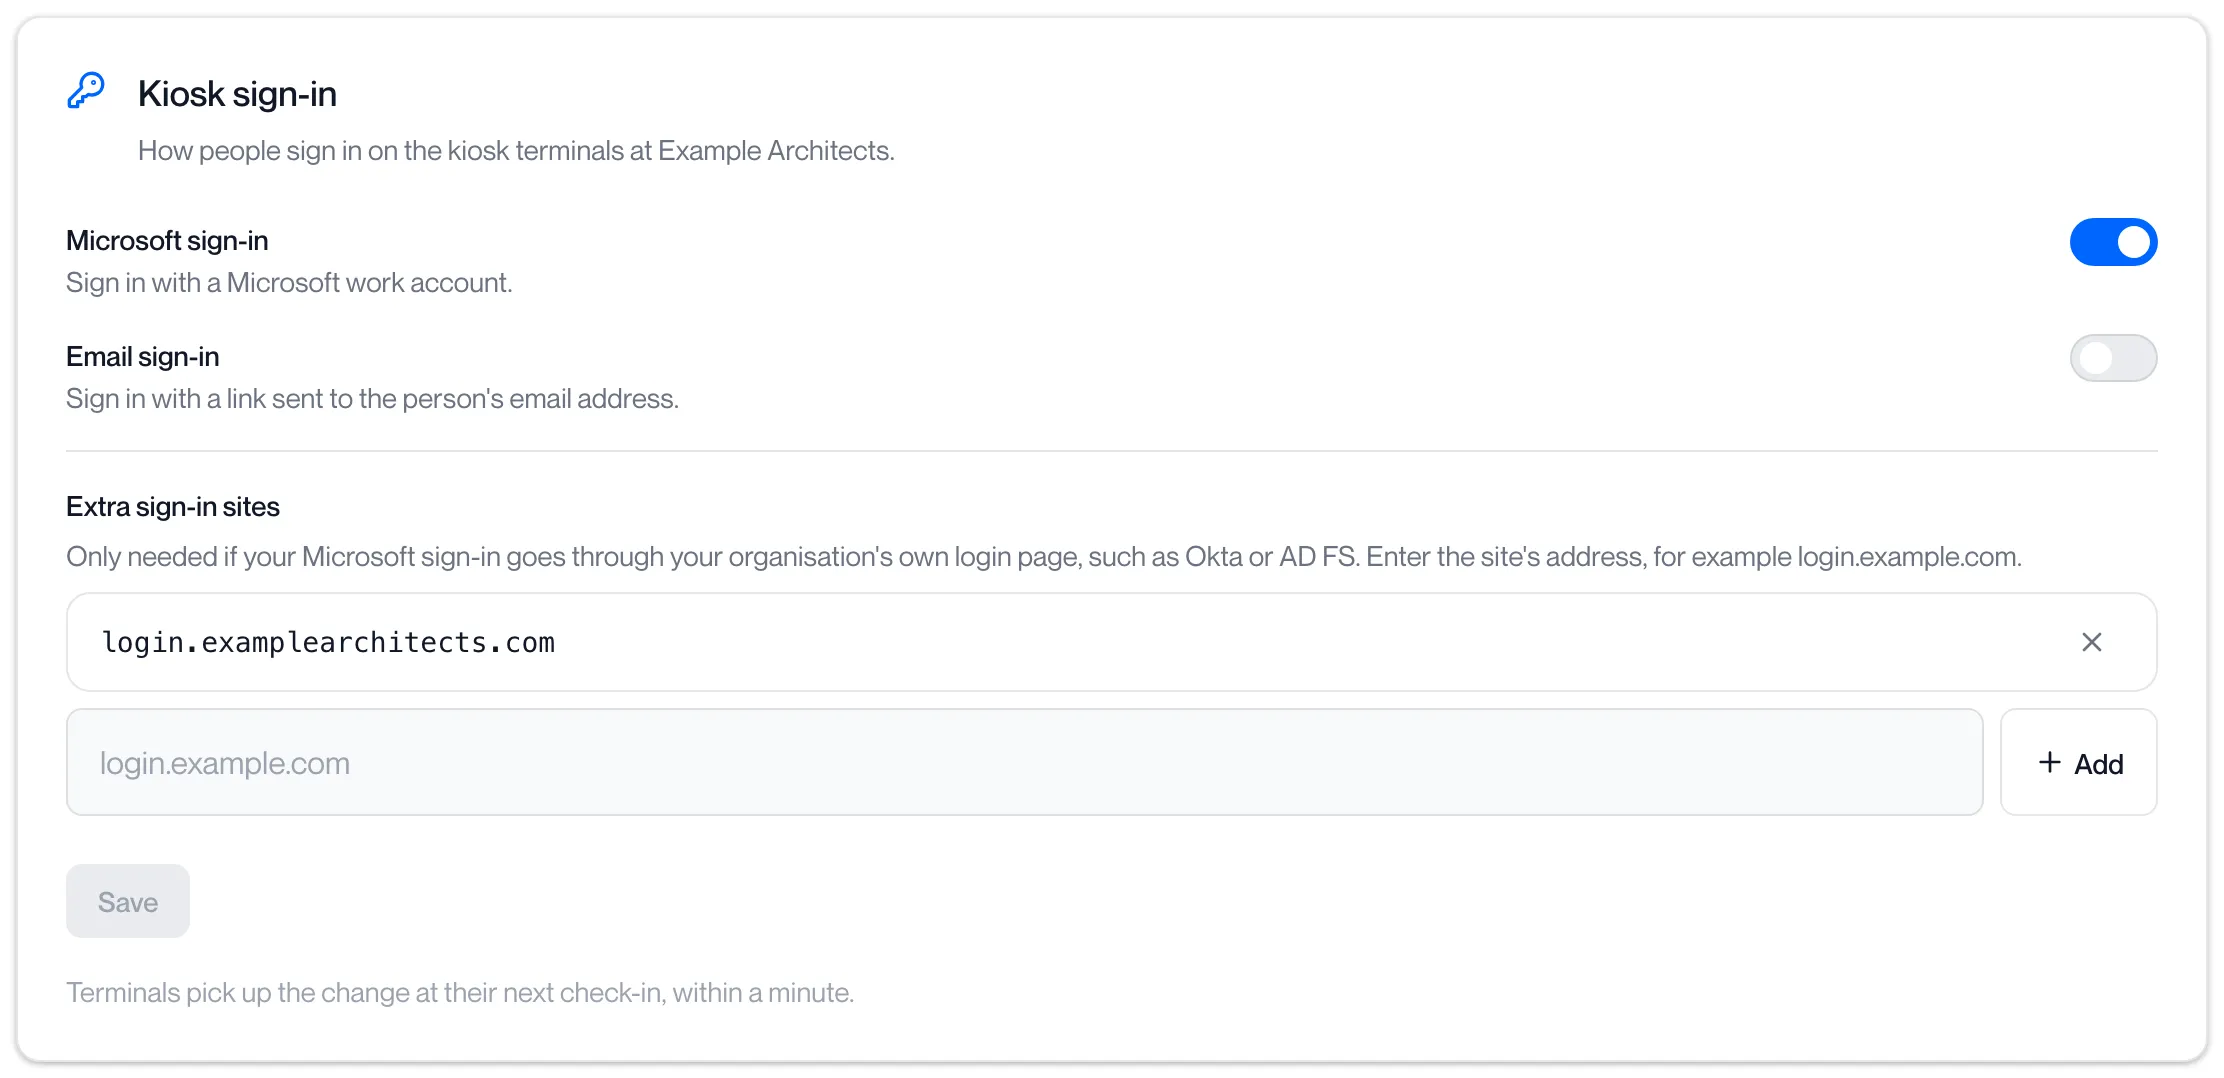
Section titled “Kiosk sign-in”How people sign in on the terminals. At least one method must be on; the portal says “Turn on at least one sign-in method.”
| Setting | Default |
|---|---|
| Microsoft sign-in: “Sign in with a Microsoft work account.” | On |
| Email sign-in: “Sign in with a link sent to the person’s email address.” | Off |
| Extra sign-in sites: up to 10 site addresses, “Only needed if your Microsoft sign-in goes through your organisation’s own login page, such as Okta or AD FS.” Enter the address only, for example login.example.com. | None |
Change kiosk sign-in
Section titled “Change kiosk sign-in”-
On the Kiosk tab, find the Kiosk sign-in card.
-
Turn Microsoft sign-in and Email sign-in on or off.
At least one must stay on; otherwise Save is refused with “Turn on at least one sign-in method”.
-
Add any extra sign-in sites.
Enter the address only, for example login.example.com, up to 10 sites. Only needed when your Microsoft sign-in goes through your organisation’s own login page.
-
Click Save.
The portal reports “Kiosk sign-in updated”. Terminals pick up the change at their next check-in, within a minute. “Could not update kiosk sign-in” means the change was not saved; try again.
Kiosk power
Section titled “Kiosk power”| Setting | Options | Default |
|---|---|---|
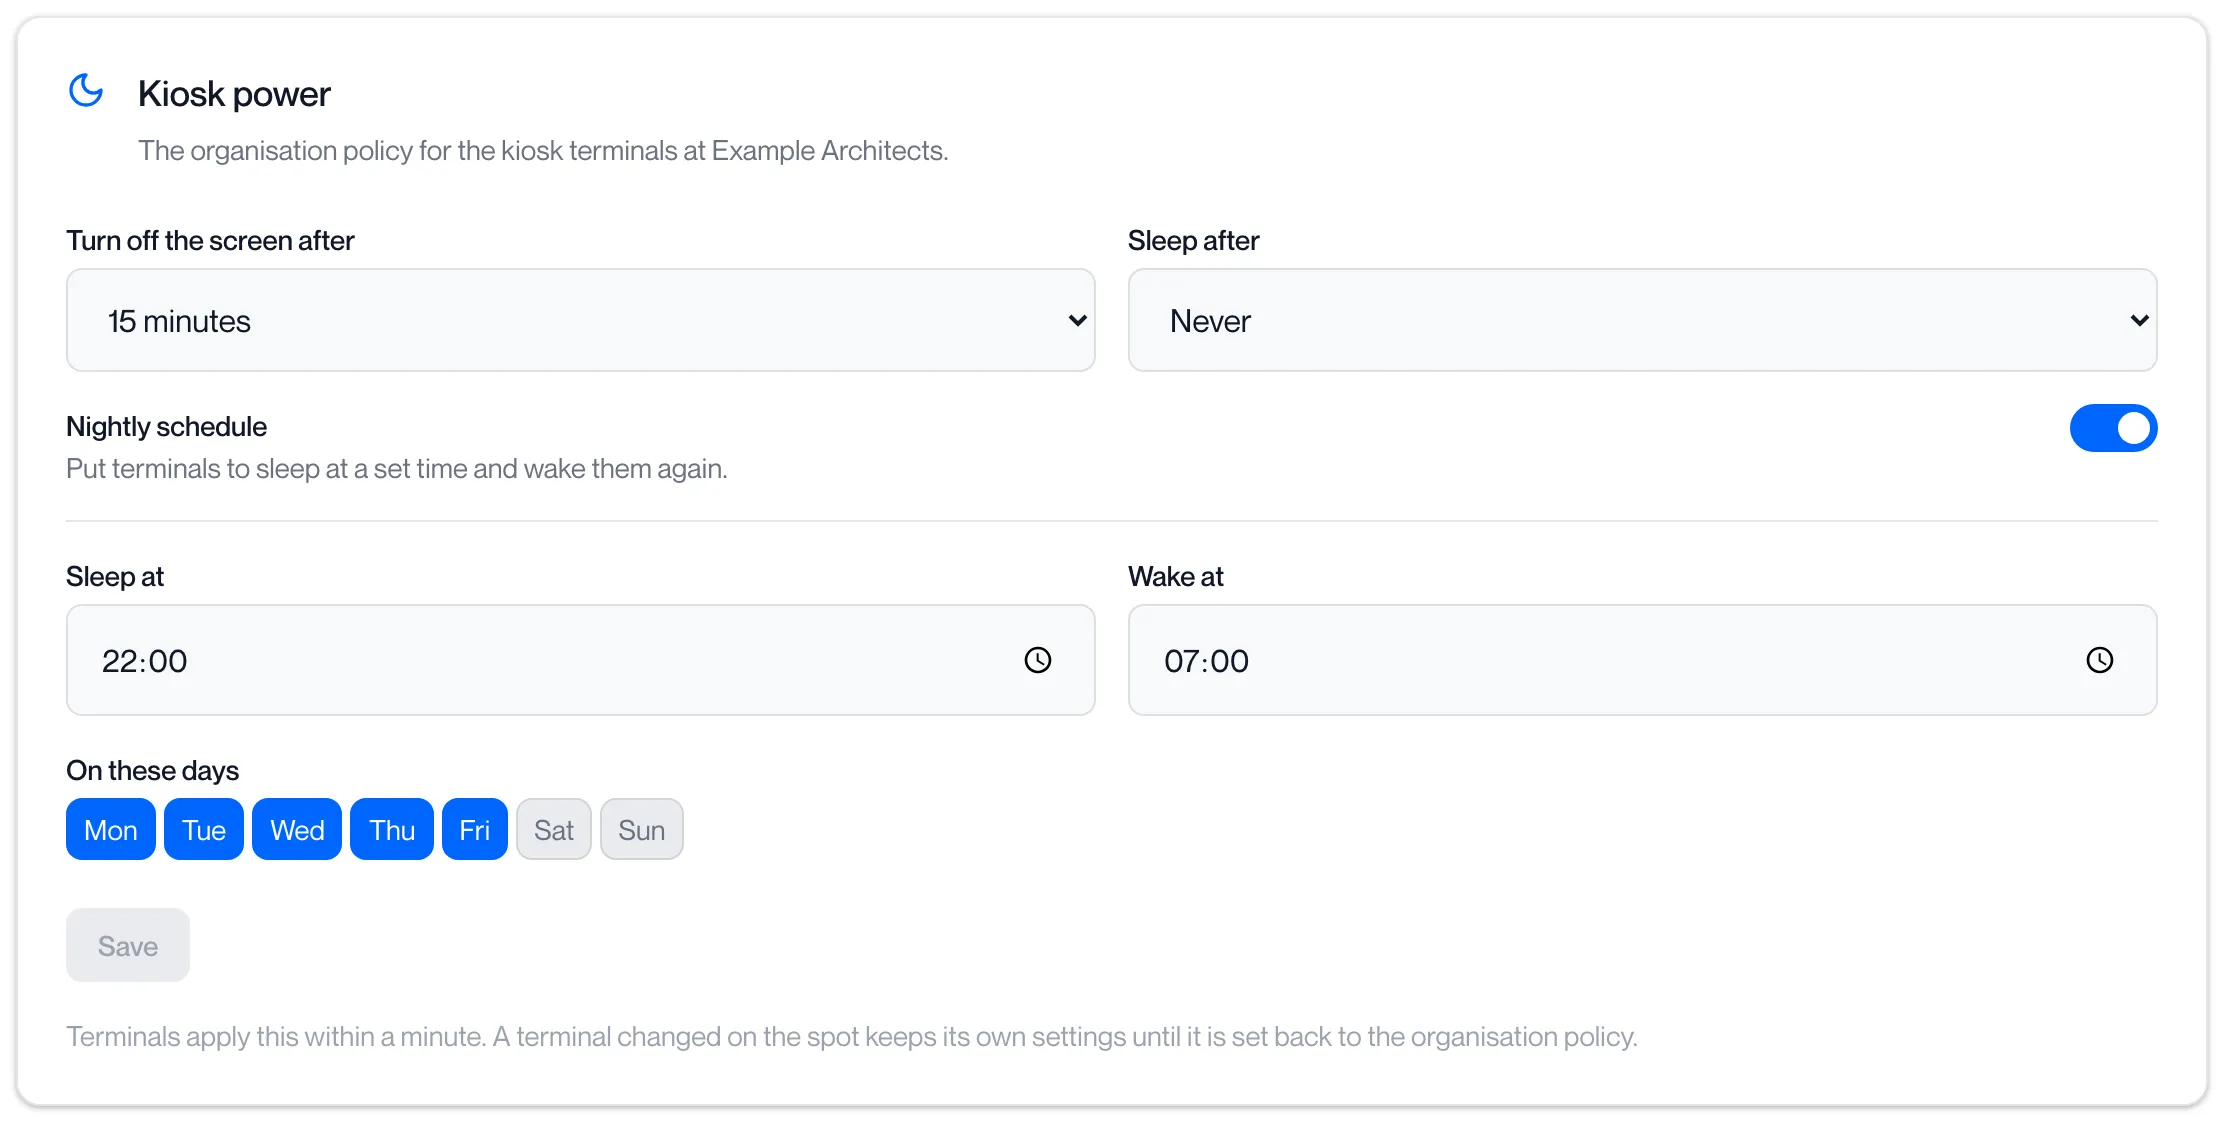
| Turn off the screen after | Never, 1, 2, 5, 10, 15, 30 or 60 minutes | 15 minutes |
| Sleep after | Never, 15, 30 minutes, 1, 2 or 4 hours | Never |
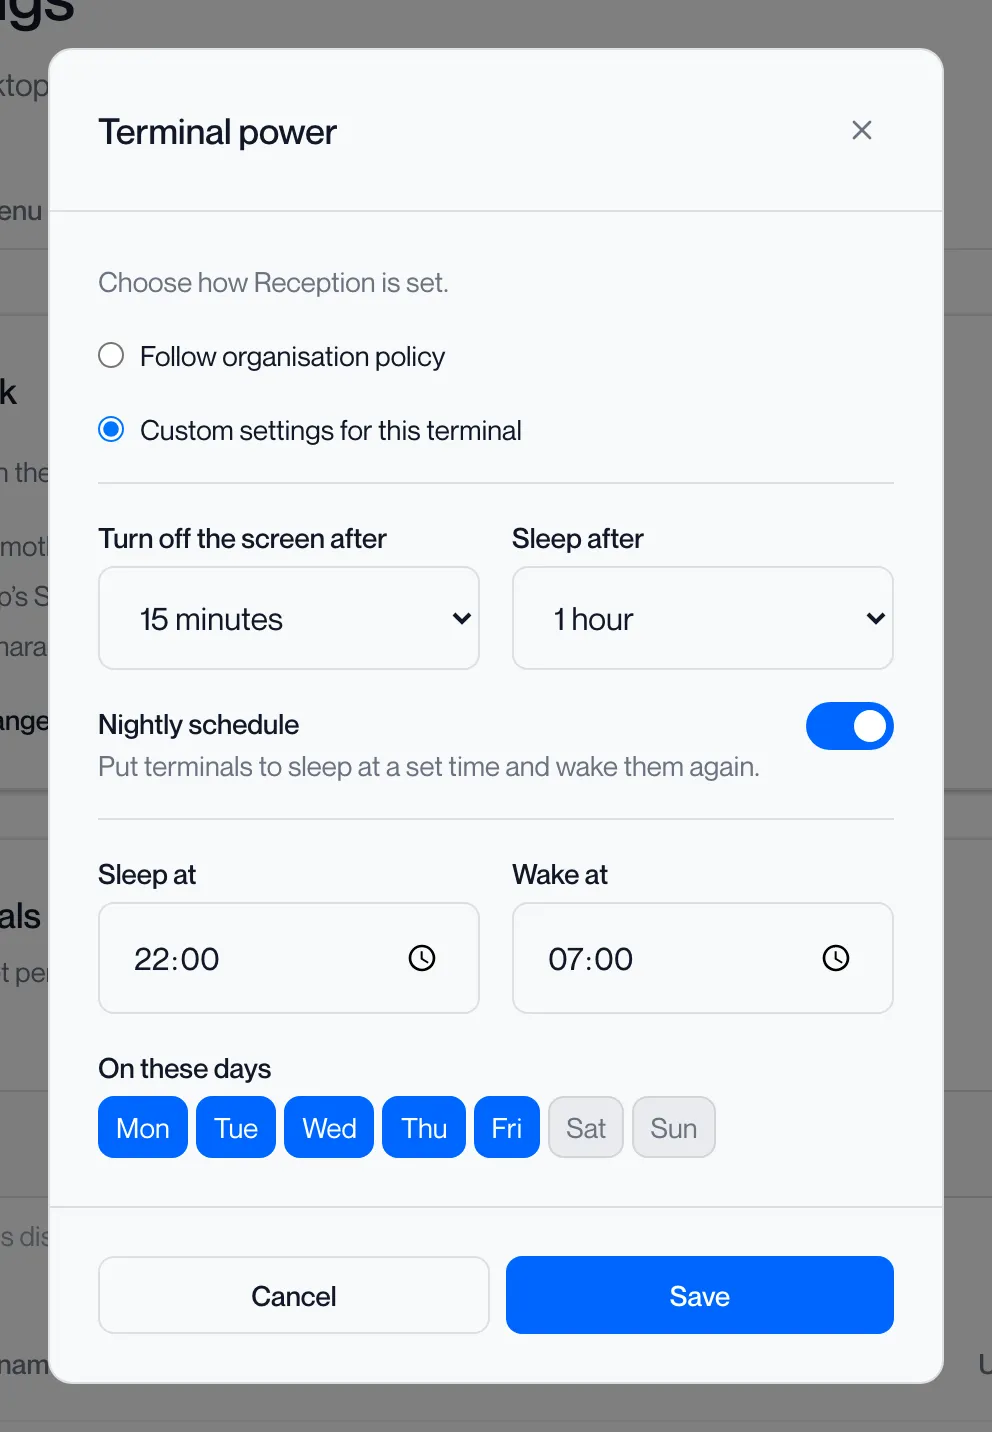
| Nightly schedule | Off, or Sleep at and Wake at times on chosen days | Off; 22:00 to 07:00, Monday to Friday when turned on |
“Terminals apply this within a minute. A terminal changed on the spot keeps its own settings until it is set back to the organisation policy.” A schedule needs both times, different from each other, and at least one day.
Set the power policy
Section titled “Set the power policy”-
On the Kiosk tab, find the Kiosk power card.
-
Choose Turn off the screen after and Sleep after.
-
Turn on Nightly schedule if the terminals should sleep overnight, and set Sleep at, Wake at and the days.
-
Click Save.
The portal reports “Kiosk power updated”. Every terminal that follows the organisation policy applies it within a minute.
| Message | What to do |
|---|---|
| “Enter a sleep time and a wake time.” | Both times are needed for a schedule. |
| “The sleep time and wake time must be different.” | Change one of them. |
| “Choose at least one day.” | Tick a day. |
| “Could not update kiosk power” | The change was not saved. Try again. |
Kiosk updates
Section titled “Kiosk updates”| Setting | Options | Default |
|---|---|---|
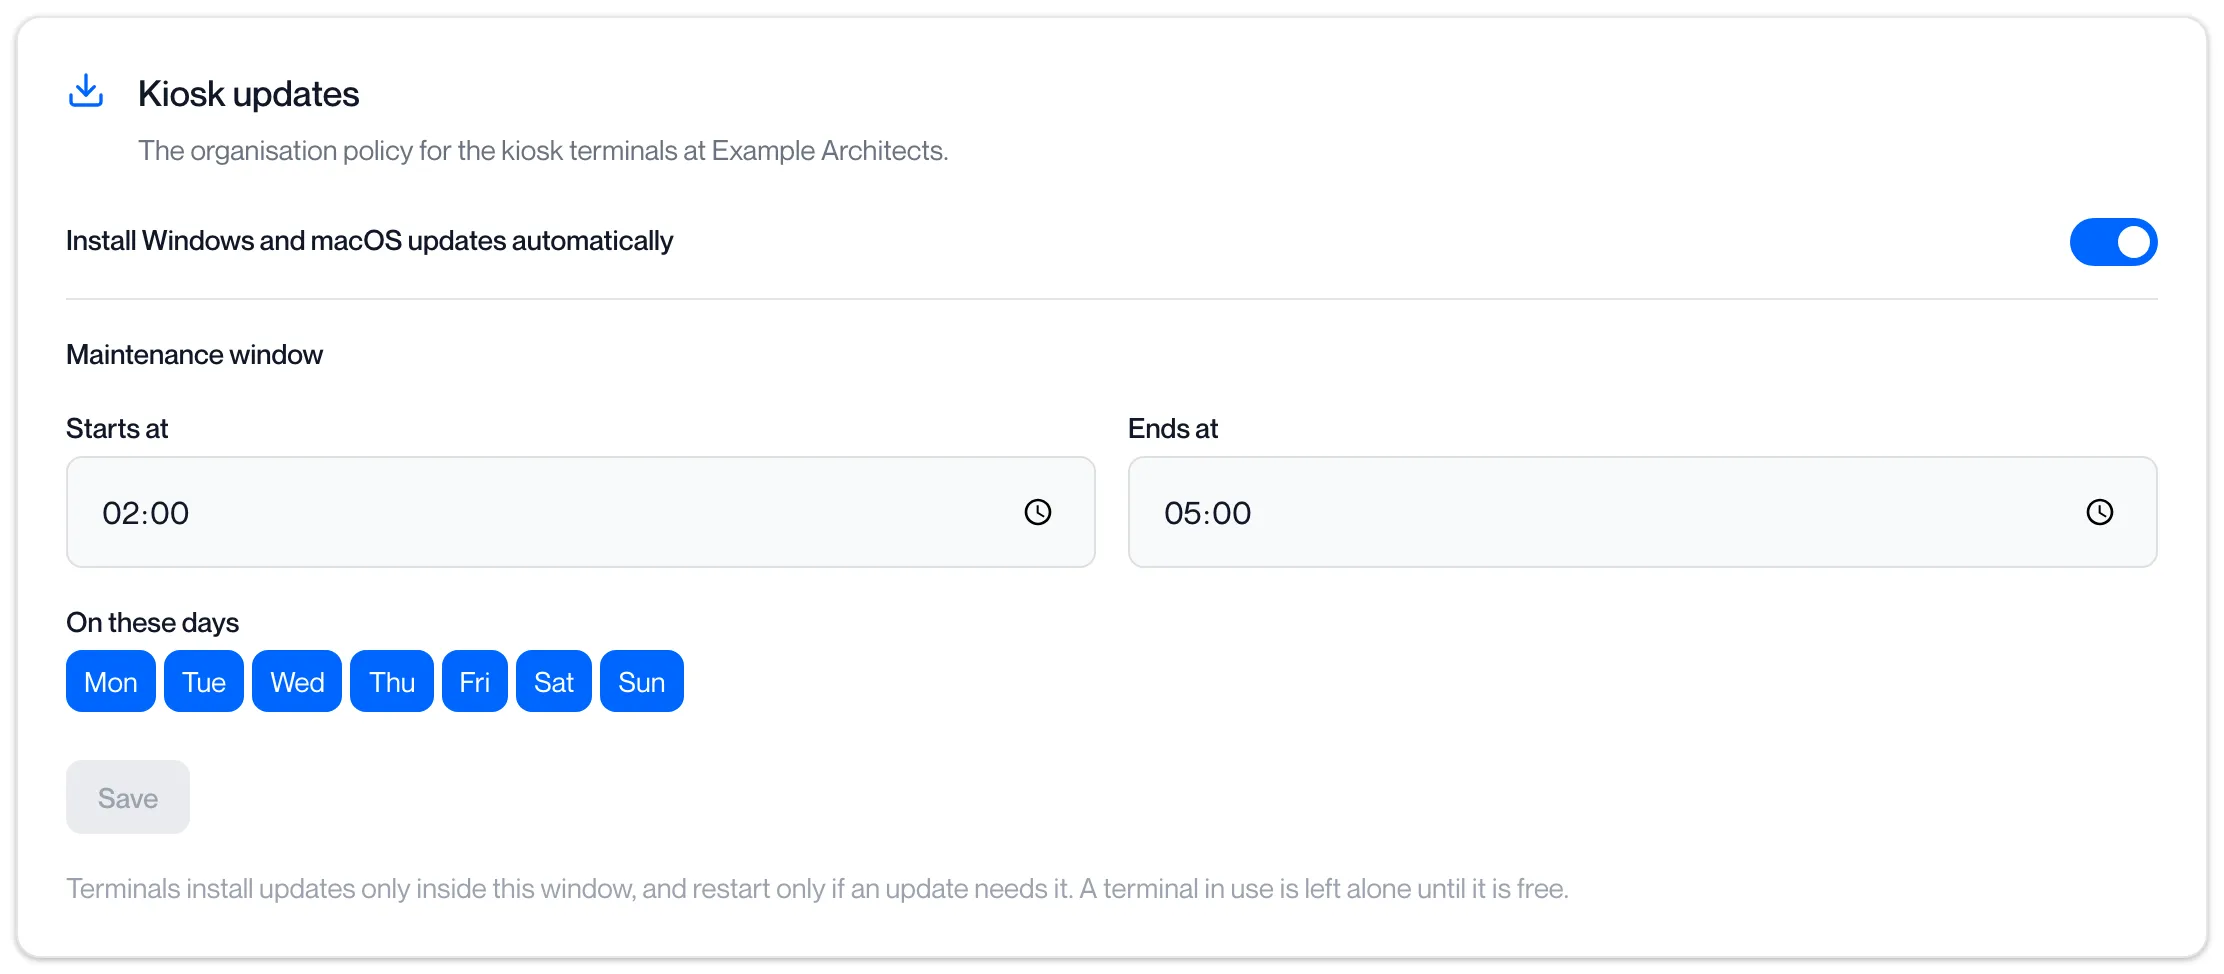
| Install Windows and macOS updates automatically | On or Off | Off |
| Maintenance window | Starts at and Ends at times on chosen days | 02:00 to 05:00, every day |
“Terminals install updates only inside this window, and restart only if an update needs it. A terminal in use is left alone until it is free.”
Set the update policy
Section titled “Set the update policy”-
On the Kiosk tab, find the Kiosk updates card.
-
Turn on Install Windows and macOS updates automatically.
-
Set Starts at, Ends at and the days of the Maintenance window.
-
Click Save.
The portal reports “Kiosk updates updated”. Each terminal’s Updates column then shows the result of its last run.
| Message | What to do |
|---|---|
| “Enter a start time and an end time.” | Both times are needed for the window. |
| “The start time and end time must be different.” | Change one of them. |
| “Choose at least one day.” | Tick a day. |
| “Could not update kiosk updates” | The change was not saved. Try again. |
Per-terminal policy
Section titled “Per-terminal policy”A terminal can follow the organisation policy or have its own. A terminal that was changed at the terminal itself “keeps its own settings until it is set back to the organisation policy at the terminal.”
Set a policy for one terminal
Section titled “Set a policy for one terminal”-
In the Kiosk terminals table, click the pencil in the Power or Updates column on the terminal’s row.
Terminal power or Terminal updates opens for that terminal.
-
Choose Custom settings for this terminal, or the organisation policy to return to it.
-
Set the same fields as the organisation card and click Save.
The portal reports “Terminal power settings updated” or “Terminal update settings updated”. The column reads Custom, or Organisation when you returned it. The terminal applies the change within a minute.